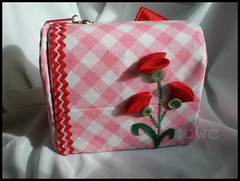
I loved my mailbox, loved it! But I detested my paint job. For serious, it didn’t come out at all the way I pictured it in my head. Partly due to my lack of practice in decorative painting, partly due to my pickiness and partly due to my hating it.
So, I thought of ways to cover it with fabric. At first I was going to Modge Podge the heck out of it. But again, I have no experience with that and with the painting fiasco still fresh in my head I decided to slipcover it. Does that make me weird? Well if this is wrong I don’t want to be right! *ahem* On to the craft . *Author's Note* After writing this tutorial I realized, the entire slipcover could have been made by hot gluing the seams instead of sewing them, seeing how it is not like it has to stand up to washings or anything. So go ahead, glue with all your might!
Materials
Fabric maybe a half yard? I used a vintage sheet I had been saving for a special occasion.
Hair elastic for closure
Something to hook it on like a push pin
Ribbon
Felt
Buttons
Ric Rac
Hot Glue & Glue gun
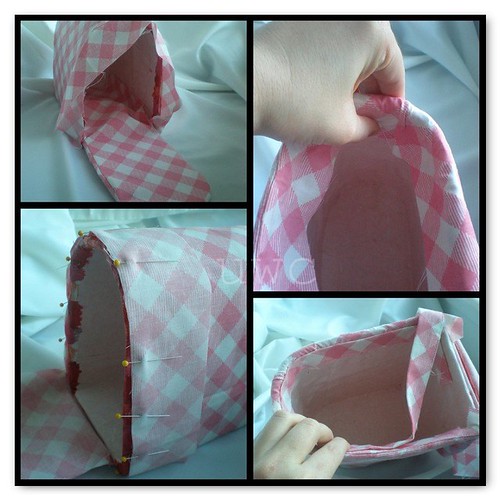
Cut your fabric like in this diagram shown. I would take this opportunity to print it out. Even though it is not a pattern (or even to scale) it will help you when reading the directions below and keep you from having to scroll up whenever I reference it. Sorry for the lack of pattern but I don’t know how to make them printable on more than one page, I should look that up. You’ll notice it looks just like the cardboard pattern but with the door attached. It essentially is. I traced around different parts of my mailbox and added a half inch for seam allowances. This is the basis of the pocket for the door flap to go into. To do that take door flap piece D and put it right sides together with door piece A. Pin together. Don’t forget to add the hair elastic (or ribbon or whatever it is you are using for a closure) in with the pins.
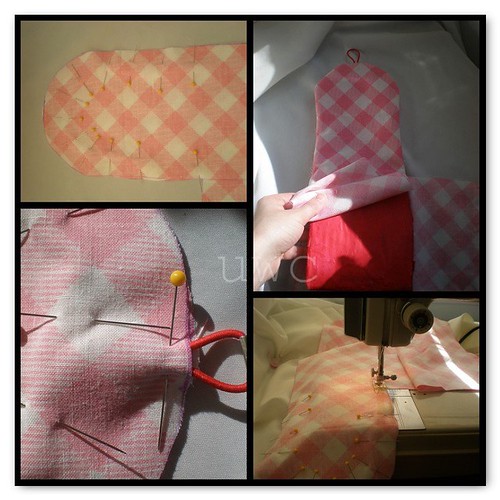
You want to sew this and turn it out first. Make sure it fits. Once that is done you can go onto the actual box cover.
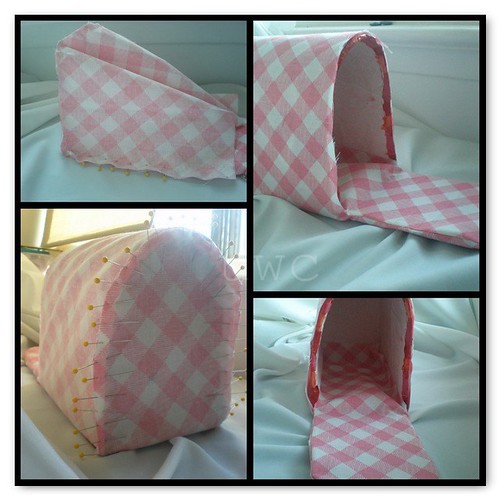
With right sides together, pin B to E just like in the bottom left photo. This will make your arch and give your slipcover it's mailbox shape.
Sew. Take out pins and turn right side right and insert mailbox to make sure it fits properly.
Now, flip inside out again and pin C to E like in the top left photo.
Once you have made sure the cover fits the mailbox you are going to pull our your handy dandy glue gun! Ignore those pins in the bottom left corner. I forgot to add flap G (in the diagram)and had to sew one on to come down over the edge and into the mailbox. It was no big deal but just now the picture made me realize I could save you the step. Now you just glue down the trim to the inside of the mailbox like in the upper right hand corner. When that is fastened, add a ribbon (I used trim from the sheet)to cover the seam inside the arch. Now, glue the flap from the door pocket to the inside base of the mailbox. This was a bit tricky with the whole HOT glue thing, but I got away with only a few battle scars, I am sure you can do way better. Seriously, I haven't picked up a glue gun in years.
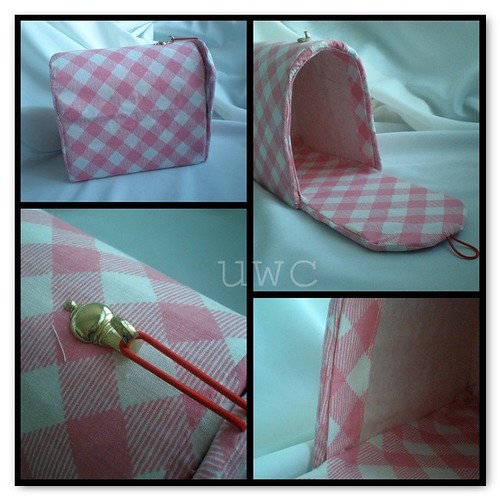
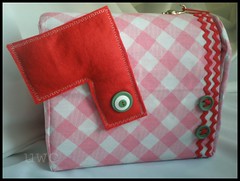
We are at the home stretch. At the front of the mailbox, you need to add a 'catch' for your elastic closure.
I used this nifty little tack we had laying around from Christmas time. After that it is embellishment time which is completely personal.
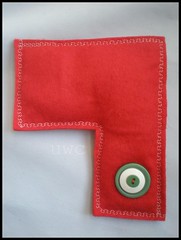
After that you can make your 'flippy thingy' our of felt and stuffing. Simply trace, stitch, stuff and close. I added some great buttons and red thread but you needn't.
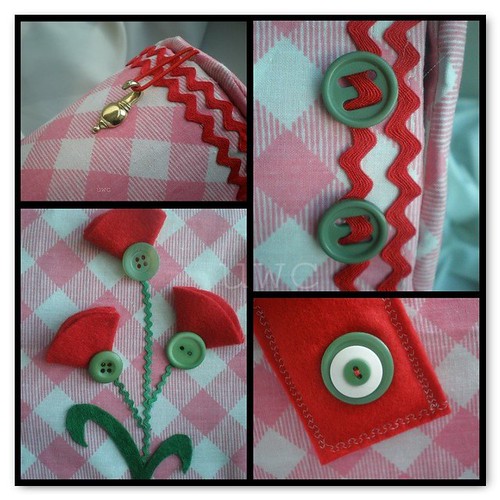
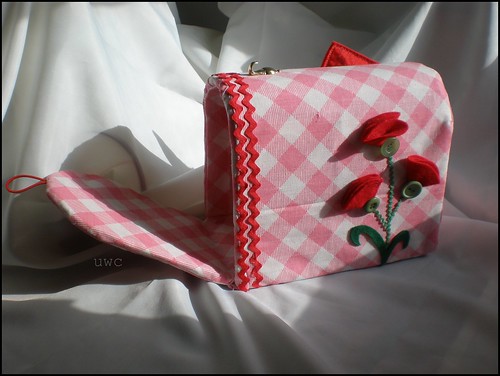
Now, the uber fun stuff. Embellishing! First I glued some green ric rack down as the stems of the flowers. Then I used some felt circles folded into quarters and glued in the middle for flowers. I covered the base of the felt with some groovy green buttons and snipped some green felt like leaves. Loved it, like for serious me and my mailbox are BFFs. To jazz up the rest I added two stripes of red ric rac (BTW I won the ric rac bunches off a woman on Ebay selling off her vintage stash, the plastic near degraded when I opened the package lol.)one stripe has two more buttons that had these great wide holes. And then I hot glued the 'flipper thingy' in place.
Ta-Daaa! You are now ready to receive some oh so sweet Valentines!
Click the photo to be taken to the papier mache construction instructions.

*Second Author's Note* I realize this how-to doesn't read very smoothly, I tried to keep it simple but I am still learning how to write an effective how to, and as my projects get more complicated, so shall my tutes I guess. I appreciate any and all feedback. And even if I confused the heck out of yas, I hope I mayhaps inspired you even a wee bit?!


5 comments:
Gorgeous mail box, from the beginning paper mache to this finished box, amazing.
love love love your mailbox!!!! we attempted one in the summer i think... it was out of cardboard and pretty paper... but i must say yours takes the gorgeous price!!! absolutely beautiful!! You are such an awesome seamstress... did u take classes?? i sew by eye.... organic... but would love to learn how to properly. Any recommends melissa?
The mailbox is DARLING!!!!!! I bet Wednesday loves it.
lisa
Melissa this is a beautiful project..I love it!
this is so adorable! I don't think that I have the skills now to pull it off as nicely as you, but this is something I would like to try. You have a lovely blog here :)
Post a Comment